Jekyll:minima结构
使用Jekyll搭建静态网站是一件容易上手,非常优雅且令人愉悦的事情,甚至让我这个服务端程序猿产生了能搞一搞前端的错觉:D
使用Jekyll搭建网站,只需要考虑页面内容即可,Jekyll现有的一些主题能很好的构建整个网站框架。这里以Jekyll默认的minima为例,简单分析一下框架的内容。
minima
分析minima之前,可以先想象一下一个普通网页应该有的样子:
- navigation bar:上方应该是一个导航栏;
- body:中间应该是网页内容;
- foot:最下面应该是网页的页脚,写着一些网站的通用信息,比如copyright之类的。
网页的这三部分不应该是手撸到一个html里的。考虑到网站的网页复用等情况,应该只有body是可变的。上下的导航条和页脚应该是所有网页共用的。所以得有模板之类的东西,我们写blog的时候只是把内容往里填。
遵循上面的思路,简单探索一下minima-2.5.1的结构。
首先,在构建出的网站的根目录下,看一下该构件使用的minima所在的安装路径。在Jekyll:GitHub Pages中,我们使用bundler将所有的gem都安装在本工程的vendor/bundle下了:
1
2
» bundle show minima
/home/win-pichu/Codes/Java/puppylpg.github.io/vendor/bundle/ruby/2.6.0/gems/minima-2.5.0
然后到该路径下,看一下minima的目录结构:
1
2
3
4
5
6
7
8
9
10
11
12
13
14
15
16
17
18
19
20
21
22
23
24
25
26
27
28
29
30
31
$ tree
.
├── assets
│   ├── main.scss
│   └── minima-social-icons.svg
├── _includes
│   ├── disqus_comments.html
│   ├── footer.html
│   ├── google-analytics.html
│   ├── header.html
│   ├── head.html
│   ├── icon-github.html
│   ├── icon-github.svg
│   ├── icon-twitter.html
│   ├── icon-twitter.svg
│   └── social.html
├── _layouts
│   ├── default.html
│   ├── home.html
│   ├── page.html
│   └── post.html
├── LICENSE.txt
├── README.md
└── _sass
	├── minima
	│   ├── _base.scss
	│   ├── _layout.scss
	│   └── _syntax-highlighting.scss
	└── minima.scss

5 directories, 22 files
参阅:
- https://jekyllrb.com/docs/structure/
layouts
layout就是上面说的网页模板,放在_layouts目录下。
_layout/default.html:一级模板
看一下minima的一个根模板(_layout/default.html):
1
2
3
4
5
6
7
8
9
10
11
12
13
14
15
16
17
18
19
20
21
22

<!DOCTYPE html>
<html lang="{{ page.lang | default: site.lang | default: "en" }}">

  {%- include head.html -%}

  <body>

	{%- include header.html -%}

	<main class="page-content" aria-label="Content">
	  <div class="wrapper">
		{{ content }}
	  </div>
	</main>

	{%- include footer.html -%}

  </body>

</html>
body标签之间的就是网页内容,模板中body大致有三块内容:
- body开头引用了
header.html; - 中间引用了内容;
- body结束前引用了
footer.html;
header.html和footer.html里分别放着导航栏和页脚。
他们是被include进来的,稍后再说。
_layout/home.html:二级模板
看一下另一个模板home(_layout/home.html):
1
2
3
4
5
6
7
8
9
10
11
12
13
14
15
16
17
18
19
20
21
22
23
24
25
26
27
28
29
30
31
32
33
34
35
36

---
layout: default
---

<div class="home">
  {%- if page.title -%}
	<h1 class="page-heading">{{ page.title }}</h1>
  {%- endif -%}

  {{ content }}

  {%- if site.posts.size > 0 -%}
	<h2 class="post-list-heading">{{ page.list_title | default: "Posts" }}</h2>
	<ul class="post-list">
	  {%- for post in site.posts -%}
	  <li>
		{%- assign date_format = site.minima.date_format | default: "%b %-d, %Y" -%}
		<span class="post-meta">{{ post.date | date: date_format }}</span>
		<h3>
		  <a class="post-link" href="{{ post.url | relative_url }}">
			{{ post.title | escape }}
		  </a>
		</h3>
		{%- if site.show_excerpts -%}
		  {{ post.excerpt }}
		{%- endif -%}
	  </li>
	  {%- endfor -%}
	</ul>

	<p class="rss-subscribe">subscribe <a href="{{ "/feed.xml" | relative_url }}">via RSS</a></p>
  {%- endif -%}

</div>
home的页头定义了自己使用的模板是default(default就是上面介绍的一个layout)。
也就是说,home是一个二级模板,它首先复用了default.html模板的内容,然后自己又定义了一些内容。自己定义的这些内容会去替换default.html的{{ content }}的内容。
home定义的元素主要分为两部分:
- 输出使用该模板的网页的content;
- 输出该网站所有的post的标题、摘要等;
那么一个使用了home模板的页面的内容一定是这样四部分的:
- 开头引用了
header.html(来自default); - body(来自default):
- 该网页自己定义的内容(来自home);
- 该网站所有的post的标题、摘要等(来自home);
- 最后引用了
footer.html(来自default);
_layouts/page.html
page和home模板一样,也是继承了default的模板,内容甚至更简单一些:
1
2
3
4
5
6
7
8
9
10
11
12
13
14
15
16

---
layout: default
---
<article class="post">

  <header class="post-header">
	<h1 class="post-title">{{ page.title | escape }}</h1>
  </header>

  <div class="post-content">
	{{ content }}
  </div>

</article>
_layouts/post.html
post模板同理:
1
2
3
4
5
6
7
8
9
10
11
12
13
14
15
16
17
18
19
20
21
22
23
24
25
26
27
28
29

---
layout: default
---
<article class="post h-entry" itemscope itemtype="http://schema.org/BlogPosting">

  <header class="post-header">
	<h1 class="post-title p-name" itemprop="name headline">{{ page.title | escape }}</h1>
	<p class="post-meta">
	  <time class="dt-published" datetime="{{ page.date | date_to_xmlschema }}" itemprop="datePublished">
		{%- assign date_format = site.minima.date_format | default: "%b %-d, %Y" -%}
		{{ page.date | date: date_format }}
	  </time>
	  {%- if page.author -%}
		• <span itemprop="author" itemscope itemtype="http://schema.org/Person"><span class="p-author h-card" itemprop="name">{{ page.author }}</span></span>
	  {%- endif -%}</p>
  </header>

  <div class="post-content e-content" itemprop="articleBody">
	{{ content }}
  </div>

  {%- if site.disqus.shortname -%}
	{%- include disqus_comments.html -%}
  {%- endif -%}

  <a class="u-url" href="{{ page.url | relative_url }}" hidden></a>
</article>
页面略复杂,大致包括:
- page title;
- date;
- author;
- 内容;
- disqus评论;
当然还包括父模板里的header和footer。
使用layout
比如使用Jekyll初始化网站之后默认生成的博客Welcome to Jekyll!就使用了post layout,它的Front Matter YAML是这么写的:
1
2
3
4
5
6
7
8
9

---
layout: post
title:  "Welcome to Jekyll!"
date:   2019-11-16 02:08:37 +0800
categories: jekyll update
---
blabla...
最终的效果如图所示: 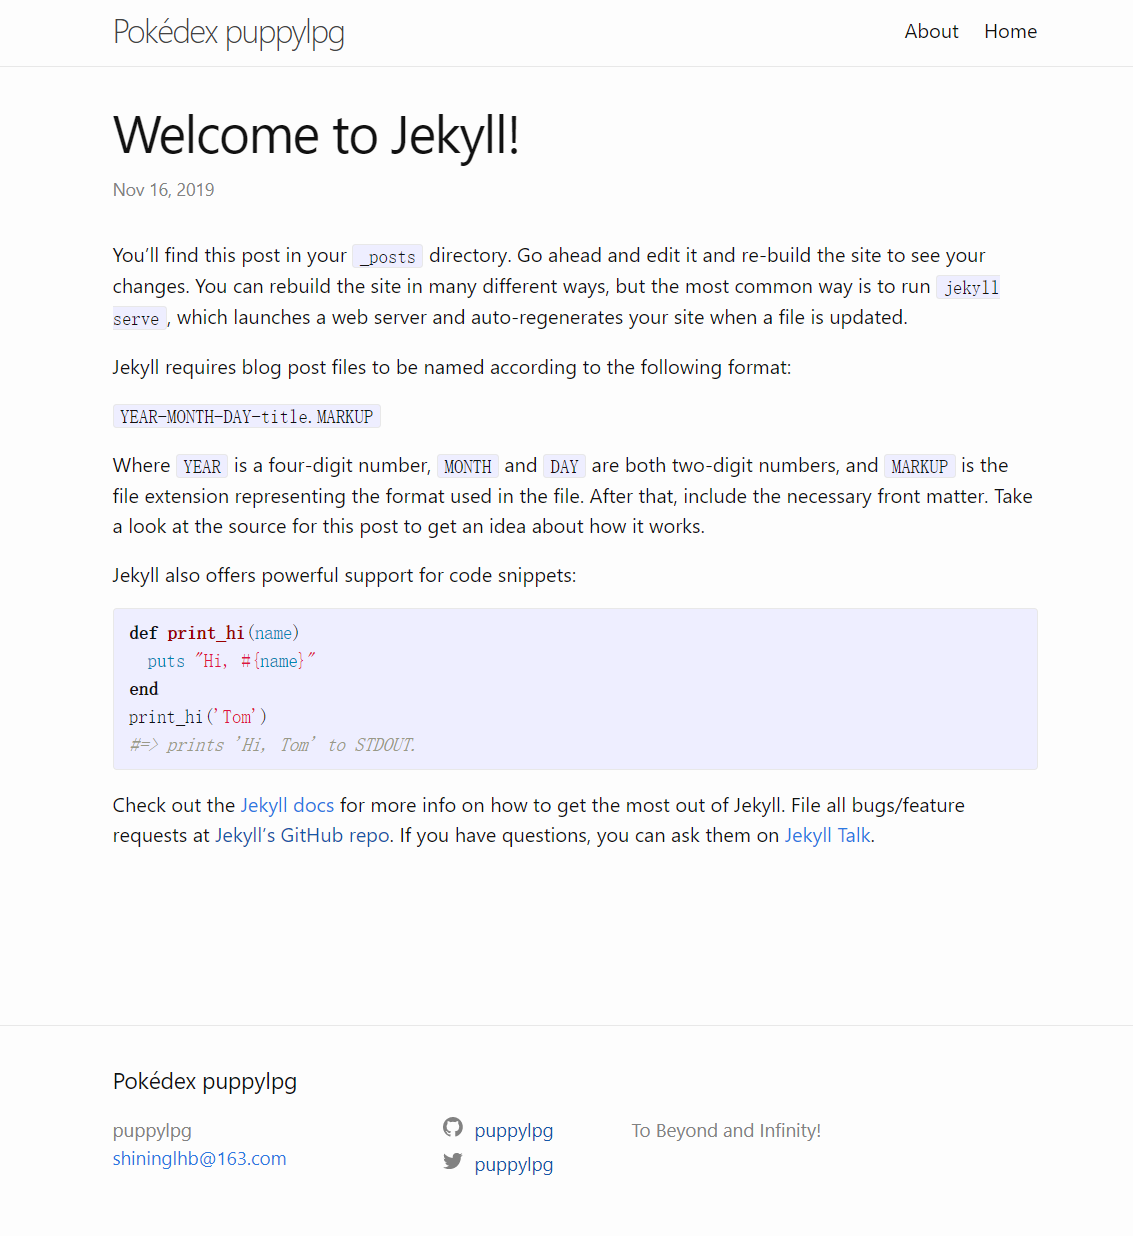
和上面介绍的post layout的页面结构一致。
参阅:
- https://jekyllrb.com/docs/step-by-step/04-layouts/
- https://jekyllrb.com/docs/posts/#including-images-and-resources
include
之前介绍default layout的时候,说它引入了header.html和footer.html。include可以轻松实现页面模块复用。
参阅:
- https://jekyllrb.com/docs/step-by-step/05-includes/
感觉最重要的就是_layouts和_includes两个文件夹,其他还有assets,_sass等,用来控制样式,放置一些静态资源如图片,有兴趣可以了解一下。
目录结构
在Jekyll:GitHub Pages中,我们使用Jekyll初始化了一个网站工程。结构大致如下:
1
2
3
4
5
6
7
8
9
10
11
12
13
.
├── 404.html
├── about.markdown
├── _config.yml
├── Gemfile
├── Gemfile.lock
├── index.markdown
├── _posts
│   ├── 2019-11-16-build-github-pages-Debian.md
│   ├── 2019-11-16-keep-alive.md
│   └── 2019-11-16-welcome-to-jekyll.markdown
├── README.md
└── _site
_posts
这里是专门放置文档的地方。因为我们会使用模板写文章,且模板只需要给出content和一些其他的信息如author、title等,所以现在写文章就很方便,只需要指定:
- 使用的是哪个模板;
- 文章内容;
- 一些author、title等模板里用到的信息;
文章需要命名为类似于_posts/2018-08-20-bananas.md就行。
比如Jekyll的样例文章:
1
2
3
4
5
6
7
8
9
10
11
12
13
14
15
16
17
18
19
20
21
22
23
24
25
26
27
28
29
30
31

---
layout: post
title:  "Welcome to Jekyll!"
date:   2019-11-16 02:08:37 +0800
categories: jekyll update
---
You’ll find this post in your `_posts` directory. Go ahead and edit it and re-build the site to see your changes. You can rebuild the site in many different ways, but the most common way is to run `jekyll serve`, which launches a web server and auto-regenerates your site when a file is updated.

Jekyll requires blog post files to be named according to the following format:

`YEAR-MONTH-DAY-title.MARKUP`

Where `YEAR` is a four-digit number, `MONTH` and `DAY` are both two-digit numbers, and `MARKUP` is the file extension representing the format used in the file. After that, include the necessary front matter. Take a look at the source for this post to get an idea about how it works.

Jekyll also offers powerful support for code snippets:

{% highlight ruby %}
def print_hi(name)
  puts "Hi, #{name}"
end
print_hi('Tom')
#=> prints 'Hi, Tom' to STDOUT.
{% endhighlight %}

Check out the [Jekyll docs][jekyll-docs] for more info on how to get the most out of Jekyll. File all bugs/feature requests at [Jekyll’s GitHub repo][jekyll-gh]. If you have questions, you can ask them on [Jekyll Talk][jekyll-talk].

[jekyll-docs]: https://jekyllrb.com/docs/home
[jekyll-gh]:   https://github.com/jekyll/jekyll
[jekyll-talk]: https://talk.jekyllrb.com/
- 用的模板是post.html;
- 用的标题和日期。如果标题不指定,会使用文件名日期后的字符串作为标题,如
bananas; - YAML Front Matter下面只需要给出文章正文就行了。
访问所有的_posts
发表的文章有很多,应该提供一种看到所有文章的机制。
在home.html模板中,已经给出了方法:
1
2
3
4
5
6
7
8
9
10
11
12
13
14
15
16
17
18
19
20
21
22
23

  {%- if site.posts.size > 0 -%}
	<h2 class="post-list-heading">{{ page.list_title | default: "Posts" }}</h2>
	<ul class="post-list">
	  {%- for post in site.posts -%}
	  <li>
		{%- assign date_format = site.minima.date_format | default: "%b %-d, %Y" -%}
		<span class="post-meta">{{ post.date | date: date_format }}</span>
		<h3>
		  <a class="post-link" href="{{ post.url | relative_url }}">
			{{ post.title | escape }}
		  </a>
		</h3>
		{%- if site.show_excerpts -%}
		  {{ post.excerpt }}
		{%- endif -%}
	  </li>
	  {%- endfor -%}
	</ul>

	<p class="rss-subscribe">subscribe <a href="{{ "/feed.xml" | relative_url }}">via RSS</a></p>
  {%- endif -%}
site.posts在Jekyll中代表所有发表在_posts下的文章。通过{% for post in site.post %}就可以遍历所有文章,并访问每个文章的date、title、excerpt等信息。
这也是使用了home.html模板的页面也会显示所有文章的原因。
参阅:
- https://jekyllrb.com/docs/step-by-step/08-blogging/
_site
这里是编译_posts里的文章生成的最终的网页,模板和内容在这里都被组装到了一起。最终我们访问网页的时候,访问的时候都是这些内容。
_site就是一个完整的静态网站。如果把它拷到Apach服务器上,一个静态网站就可以直接访问了。
index.md
1
2
3
4
5
6
7
8
9
10

---
# Feel free to add content and custom Front Matter to this file.
# To modify the layout, see https://jekyllrb.com/docs/themes/#overriding-theme-defaults
layout: home
title: Home
list_title: puppylpg wanna say -
---
Welcome to puppylpg's home website, pika~
index页面使用的模板是home.html,所以会列出所有的文章目录。
about.md
1
2
3
4
5
6
7
8
9
10
11
12
13
14
15
16
17
18
19
20

---
layout: page
title: About
permalink: /about/
---

This is the base Jekyll theme. You can find out more info about customizing your Jekyll theme, as well as basic Jekyll usage documentation at [jekyllrb.com](https://jekyllrb.com/)

You can find the source code for Minima at GitHub:
[jekyll][jekyll-organization] /
[minima](https://github.com/jekyll/minima)

You can find the source code for Jekyll at GitHub:
[jekyll][jekyll-organization] /
[jekyll](https://github.com/jekyll/jekyll)


[jekyll-organization]: https://github.com/jekyll
about使用的是page模板,路径是/about。关于路径,下面会介绍。
_config.yml
config文件可以配置很多东西,比如:
- 全局变量:可以指定一些键值对,这些键值对最终都能通过
site变量引用; - 主题:比如现在用的minima;
- 插件;
其他。
修改其他文件都能做到动态加载,在不重启本地server的情况直接看到变化。但是修改
_config.yml里的内容必须重启server。
参阅:
- https://jekyllrb.com/docs/configuration/
Gemfile & Gemfile.lock
使用Gemfile最大的作用就是指定工程使用的依赖(gem)的版本,通过bundler就可以使用Gemfile中指定的这些版本的gem构建工程,保证构建的一致性。
构建方式:
- 安装gem:
bundle install; - 更新某个gem:
buldle update <gem>;
安装或者更新完gem后,会生成Gemfile.lock,它是最后一次执行完构建后,一切都没啥问题的gem和版本。所以它相当于是当前系统使用依赖(及版本)的一个快照。
(Gemfile一般定义的是一个gem的范围,比如使用大于2.0版的Jekyll等等,而Gemfile.lock记录了最后一次成功构建时使用的Jekyll的具体版本,比如2.1.1。)
- https://bundler.io/v1.7/rationale.html#checking-your-code-into-version-control
minima主题自定义
minima是Jekyll默认且最基本的主题,如果想增加更多的定制,可以参阅minima主题自定义
总结
折腾了两天之后,不得不感叹前端的东西果然是丰富多彩。比如想给网站添加sidebar,里面放文章的目录内容。虽然sidebar大差不差勉强算是搞定了,但是很多细节还需要去处理,尤其是toc在这里并不能生成目录,还得想办法去解决。
折腾前端也是耗时间的一件事。而现在的我要学的东西还很多,也不能在前端这儿一直耗着。所以先这样吧,反正目前网站看起来凑合能用了。其他的比如字体,sidebar,图片之类的东西,用一段时间之后再修改一些东西吧,反正一直慢慢用着改着,挺好的。
多看几个官方网站:
- minima的官网:https://github.com/jekyll/minima/blob/master/README.md
- Jekyll的官网:https://jekyllrb.com/
githup-pages:https://github.com/github/pages-gem